


Enzo Tutorial: Send MXChip Temperature Data to Azure Tables
- Nov 9, 2017
- 5 min read
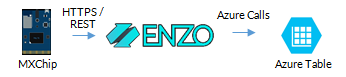
In this tutorial, you will use Enzo Online to forward telemetry data coming from an MXChip to an Azure Table. This tutorial is broken up in multiple steps allowing you to configure and test the overall plumbing of the solution without an actual physical device, and finally test the complete solution if you do have an MXChip device available.
Once this tutorial is completed you will be able to send telemetry data from the MXChip device into an Azure Table easily, without having to download special libraries or SDKs. Enzo Online also allows you simulate sending data on behalf of the MXChip device if you don't actually own one.
Pre-requisites
In order to follow this tutorial, you will need:
An Azure subscription (https://portal.azure.com)
An Enzo Online subscription (https://portal.enzounified.com)
Fiddler or another HTTP tool to test configuration settings
An MXChip device with VS Code to push code to it (https://microsoft.github.io/azure-iot-developer-kit/docs/get-started/)
NOTE: You can follow most of this tutorial without an actual MXChip device, and you can even simulate a device by sending random data through Enzo, as you will see later.
Service Configuration
Before proceeding, you must configure two services: an Azure Storage account, and an Enzo Azure Storage service. The Azure Storage account will host your Azure Table in the cloud, and the Enzo Azure Storage service will proxy access to your Azure table using simple HTTPS calls.
Configure Azure Storage
To create an Azure Storage account, you must logon to your Azure Portal and provision a new Storage Account following the steps provided by Microsoft.
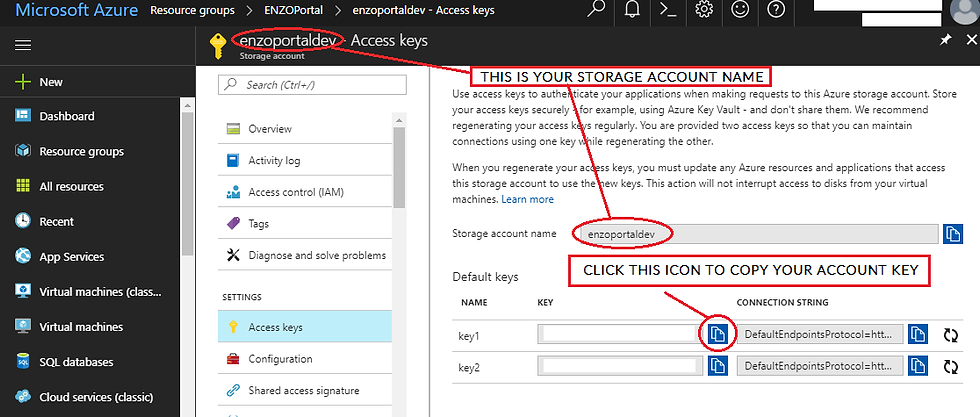
Once you have created your Azure Storage account, you must find and copy two pieces of information: the name of the storage account you just created, and its Access Key. The Access Key is conveniently found in the Access Keys pane; you can copy either Key1 or Key2 for this tutorial.
Configure Enzo Online Services
Once your Azure Storage Account has been created, you can configure Enzo Online to point to it. Login to the Enzo Online portal and select Azure Storage on the left menu; then click on the Create button on top.
Enter the following information:
Name: azstore1
Enzo Instance: (keep default selection)
Storage Account Name: (the name of your storage account)
Storage Account Key: (the key you copied above)
Click on Create to save this information. You should now see a screen similar to this one:
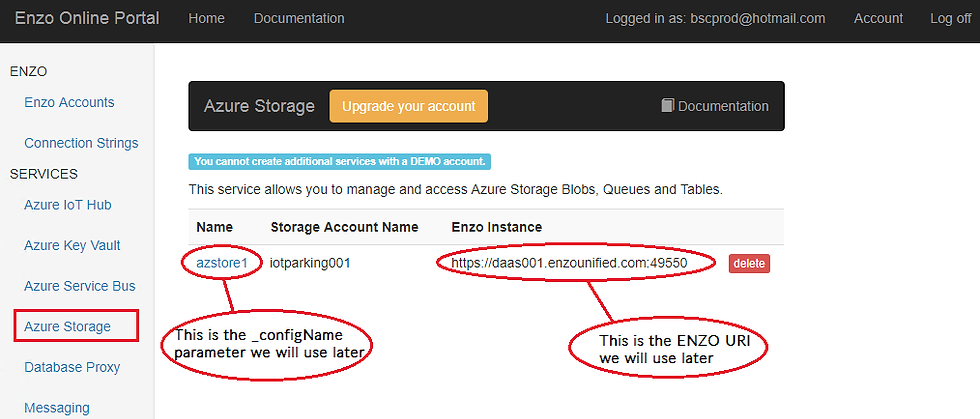
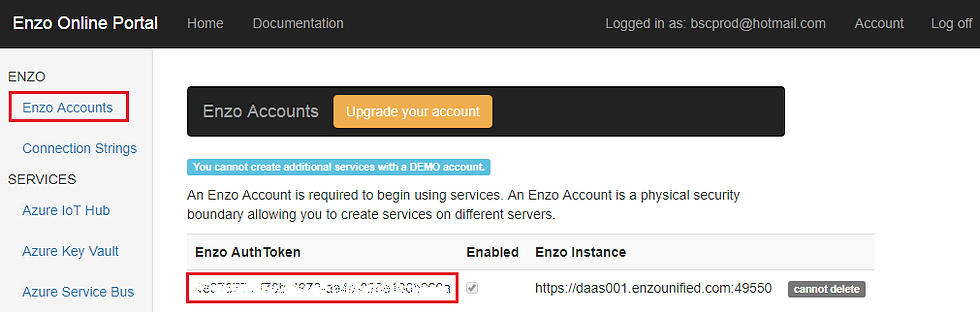
Last but not least, let's locate your Enzo Authentication Token, also called authToken. This token must be provided in every call to Enzo. This token, along with the _configName value tells Enzo who is making the call, and which settings to load. You can locate your authToken in the Enzo Accounts tab.
Create Azure Table with Fiddler (or other HTTP tool)
Before proceeding to the next steps, let's make sure it all works, and let's also create and Azure Table using Fiddler; you can use any HTTP tool you want if desired (ex: Chrome's REST Client, Postman...).
Start your favorite HTTP tool and craft an HTTP request that looks like this:
GET https://daas001.enzounified.com:49550/bsc/azurestorage/gettables HTTP/1.1 authToken: YOUR_ENZO_AUTHTOKEN _configName: azstore1
NOTE: The URI of Enzo could be different for your account; make sure to use your Enzo Instance URI as shown on the Enzo Account page.
If this all works, you should get an HTTP 200 response. However there may not be any data being returned yet simply because we haven't created an Azure Table yet. So let's do that.
Run the following command through Fiddler (this time we are sending a POST operation; note that we are specifying the name of the table to create as 'logdata'):
POST https://daas001.enzounified.com:49550/bsc/azurestorage/createtable HTTP/1.1 authToken: YOUR_ENZO_AUTHTOKEN _configName: azstore1 tablename: logdata
Last but not least, let's add a record (also called an Entity in Azure speak) and retrieve it through Fiddler.
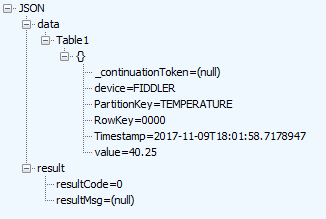
POST https://daas001.enzounified.com:49550/bsc/azurestorage/saveentity HTTP/1.1 authToken: YOUR_ENZO_AUTHTOKEN _configName: azstore1 tablename: logdata xml: <root><PartitionKey>TEMPERATURE</PartitionKey><RowKey>0000</RowKey><device>FIDDLER</device><value>40.25</value></root>
This operation expects a well-formed XML; we are simply providing the required PartitionKey, RowKey, and additional properties to be saved, namely the device name and temperature value. An HTTP 200 OK indicates that the entity was saved in your Azure Storage Account. Since Azure Table is a no-sql service, we can send any valid XML as long as it confirms to a few rules; for example the XML must contain two nodes: PartitionKey and RowKey.
HINT: The SaveEntity method understands Enzo Functions, which allow you to randomize data on the fly; for example you could send a random temperature using the #rnddouble(a,b) method, or send a random Guid for the RowKey using #rndguid(). We will use the #rndguid() method later in this tutorial.
Now let's get our entity back by calling GetEntities. This method allows you to specify a filter; however we only have one entity right now, so let's keep it simple.
GET https://daas001.enzounified.com:49550/bsc/azurestorage/getentities HTTP/1.1 authToken: YOUR_ENZO_AUTHTOKEN _configName: azstore1 tablename: logdata
We can inspect the data in Fiddler and observe that our entity was indeed saved in the Azure Storage account.
You are now able to interact with your Azure Storage account through simple HTTPS requests, without requiring an SDK or advanced tools. Armed with this capability, we can now create our C++ code that will run on the MXChip and send temperature data into our Azure Table by making HTTPS calls to Enzo Online.
MXChip Code
Before continuing, you should make sure you have installed VS Code, configured your workstation to push code to it, and have setup your MXChip to communicate through your WiFi. All the information necessary to perform these steps can be found on the Microsoft IoT DevKit site.
You can also read my first blog on the MXChip to check out a few tips on how to get up and running with VS Code.
The full source code, including the necessary libraries can be found here: http://www.enzounified.com/downloads/Tutorials/MXChipEnzoTutorials.zip - download the Zip file and extract it into a folder on your machine.
Start VS Code, then open the EnzoMXChip-SaveAzureTable folder where you downloaded the above project (File -> Open Folder).
Before running the code, you will need to modify the enzoAuthId variable by pasting your Enzo authToken. Make sure the Enzo URI is correct, and the Azure Table Name and Enzo Configuration Name are also correct, then run the Deploy Task from VS Code to push it onto the MXChip (Task -> Run Build Task) - be patient... this could take a few minutes the first time.
The relevant C++ code that sends data through Enzo is as follows:
void sendCurrentTemp()
{
float temperature = getCurrentTempF();
HTTPClient client = HTTPClient(enzoCERT, HTTP_POST, enzoAzureStorageURI);
// The PartitionKey is a constant
// The RowKey is a Random Guid generated by Enzo on the fly to ensure uniqueness
char xmlBuff[1024];
snprintf(xmlBuff,
sizeof(xmlBuff),
"xml=<root><PartitionKey>TEMPERATURE</PartitionKey><RowKey>#rndguid()</RowKey><device>%s</device><value>%s</value></root>", appLabel, f2s(temperature, 1));
client.set_header("Content-Type", "application/x-www-form-urlencoded"); // required for posting data in the body
client.set_header("authToken", enzoAuthId);
client.set_header("_configName", configName);
client.set_header("tablename", tableName);
// NOTE: Sending the XML as a body parameter instead of a header
const Http_Response *response = client.send(xmlBuff, sizeof(xmlBuff));
}
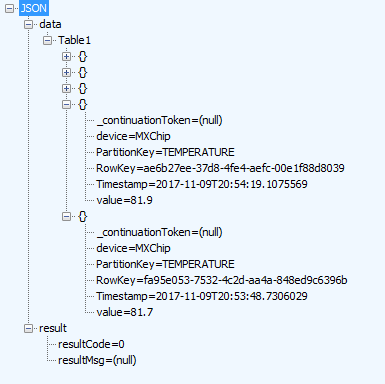
The above code sends the current temperature to the Azure Table through Enzo Online. You can see the data being posted through Fiddler by running the GetEntities command as we did earlier.
Of importance, note that the RowKey specified in this code is set to #rndguid(). This is an Enzo function that the SaveEntity command understands, which creates a new random Guid automatically for you, so you don't have to do this in C++. Other commands are available (see the Enzo documentation).
Also note that the XML is sent through the body of the request (the xmlBuff variable); not as an HTTP header. Sending a body requires sending an HTTP POST operation, and specifying the Content-Type appropriately.
After a couple of minutes, you will see additional entities/records in the Azure Table as expected, with a random Guid for the RowKey.
Summary
This tutorial helps you get up to speed with MXChip development, and guides you through the steps necessary to save data in an Azure Storage Table through the Enzo Online service.
As you can see from this tutorial, saving data to Azure does not require any specialized SDK/library when using Enzo Online, and simplifies development on the MXChip significantly since access to complex capabilities is performed through simple HTTP requests from the chip.
Comments